Showing posts with label bike set up. Show all posts

Wednesday, 9 April 2014

Bike Build: Specialized Shiv Elite A1... with some mods.

While waiting to get back on a stealthy Shiv TT rig again after my ''van Summeren" moment on Richmond Boulevard, I pulled the trigger on a budget TT bike, a Specialized Shiv Elite A1 Apex.

The budget-minded Shiv Elite features a lightweight alloy frame with UCI-legal airfoil tubing, a stiff carbon fork, and our Hydroformed Alloy Aerobar for wind-cheating speed and solid handling. The SRAM Apex 10-speed drivetrain adds reliability and efficiency.

Out-of-the-box pretty.... A good starting canvas.
These bikes hit the market somewhere around the $1500 mark, then dropped to $999, and if you're lucky you'll find one lower than that. I've pointed a few people towards these rigs in the past and they've been happily TTing away on them.

Everything comes in one massive box, wheels and all, partially assembled. Thanks to the guys at The Ride Cycles, the first thing I did in the workshop was to disassemble everything to start the build from scratch with my own parts. I had a plan to squeeze more speed from the budget-beast.

I'm very happy with the result. I was able to set this up with the exact measurements from the Shiv. The basebar is a little higher, but the arm pads are spot on for height.

Done!

Swapped out parts:

Groupset: SRAM Apex -> Shimano Dura-Ace 7800/7900 mix.
Cranks: SRAM S150 -> SRM Wireless Ant+ 175mm.
Brakes: Tektro -> Shimano Ultegra Rear, TRP T925 Front.
Brake Levers: TRP TL720 Aero lever -> Shimano Dura-Ace BL-TT79 Carbon.
Saddle: Romin Evo Comp -> Specialized Sitero.
Stem: Specialized EliteSet -> 3T -17degree 110mm.
Headset: 20mm spacer cone -> Replaced with low profile spacer.

Modifications:

Basebar: Kicks removed from outside/brake levers to flatten the front end.
TT bars:  Shortened to meet 2014 UCI regulations (80cm from tip of lever to center BB). Mounted underneath the basebar. 
TT pads: Slammed on top of base bar. Secured with longer bolt into the TT bars on the underside.


Tuesday, 29 May 2012

The Poor Man's TT Bike

Cadel - Leaving the clownery for charity days.
The tile is a little misleading, I don't mean financially poor, I mean 'you poor bastard' if you have to ride a time trial on a road bike. Road bikes are not designed for cutting into the wind.... but with some attention to detail and a few tweaks, you can get more speed with the same power, on your road bike.

We'll start with an ambiguous definition: "Mass start event equipment only".

From that I have to make a few assumptions. UCI legal equipment for mass start road races. I'll ignore the grey area of certified frames and wheel sets, sticking to what we see at crits and road races from club level up to national events here in Australia.

The three P's of time trials are: Position, Position, and Picking races that allow time trial equipment. Failing the last one you'll have to focus on the first two. The commonly quoted statistic for wind resistance is 90% rider and 10% bike..... This is probably only vaguely in the ballpark, but illustrates how important position is. Whatever the real figures, both rider and the bike add up to 100% of wind resistance so we need to focus on both as a single unit.
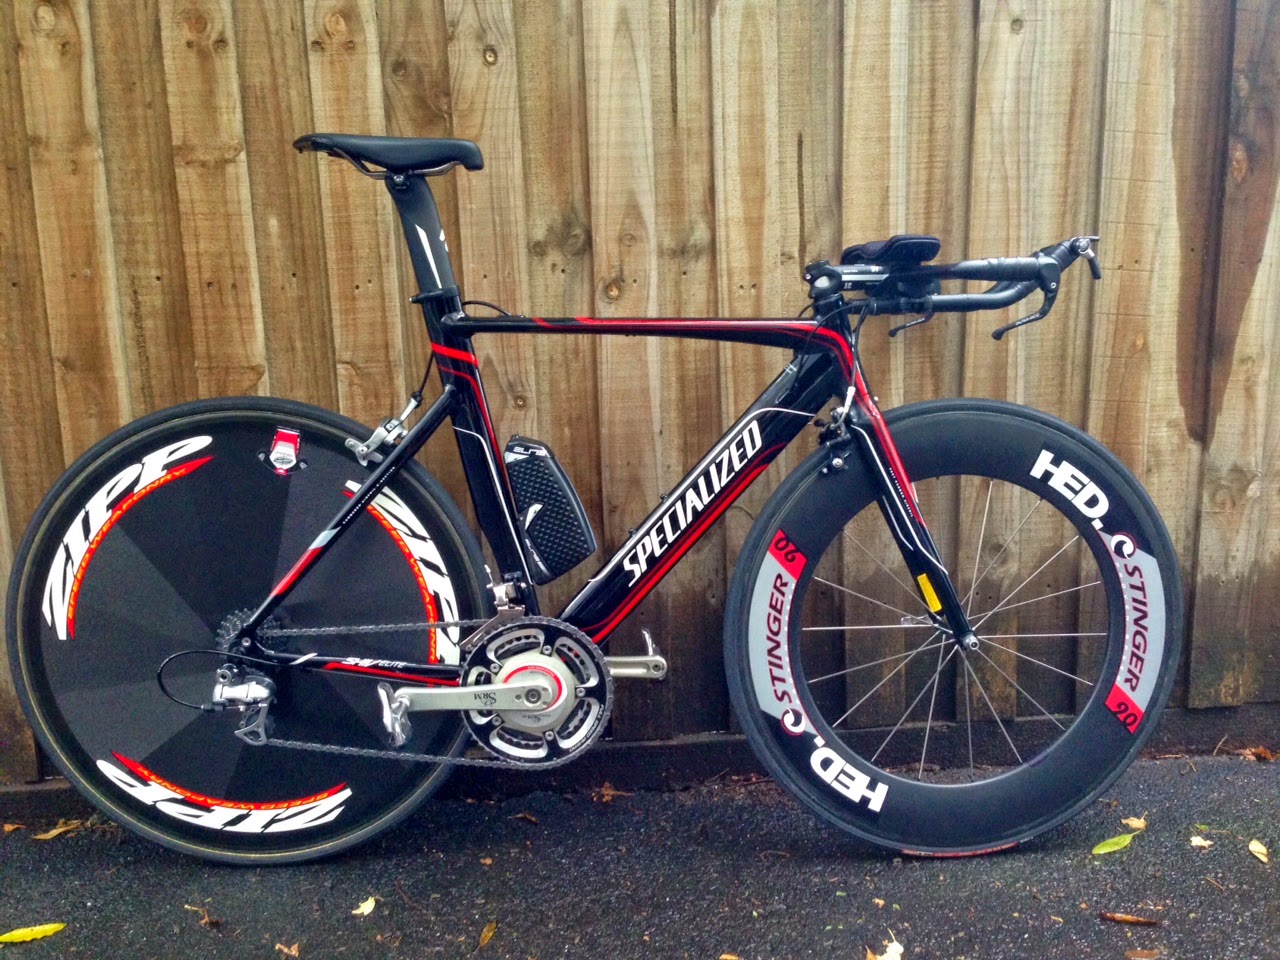


Free Speed:

- TT helmet: They CAN be used in mass start events, they are AS/NZS certified. Although you wouldn't wear one in a bunch, you can, so you'd be crazy not to have one for a individual race against the clock. Not all TT helmets are equal, not all helmet fits match the rider. It'd be safe to say any TT helmet is better than a road helmet. Get one.

- Clothing: Skinsuit. Make it tight. Aero boot covers. Make them tight. Socks as high as you can find (for style, and just to piss the UCI off).

- Remove Unnecessary Equipment: Remove bottle cages/pumps/saddle bags. Nothing in your pockets (tricked you! You're already in a skinsuit with no pockets!)

- Deep wheels: As deep as you can get. Use 80mm, 90mm, Zipp 808's or 1080's if you can find them and get away with them.

- Fast Rubber: If you're on tubulars then you know what you're doing. If you're on clinchers do your research, or just fork out for Vittoria Open Corsa Evo CX with latex tubes.

and saving the most detailed one for last....

- Drop your bars: Drop them LOW. Slam your stem. Get yourself a -17degree stem or an adjustable one. You can't go full retard on this as your drops have to still be above the top of your front wheel, most people will have 2-3 inches to play with, easy. "But that is insane and uncomfortable".... Have you ever done a comfortable TT? Since you're not allowed to use clip-on's (commonly known in other circles as strap-ons, just don't Google that), we have to get creative. Double bar tape or triple tape the tops of your bars to make them super-soft, soft enough to rest your elbows on..... and enough so they can rest there while your forearms are pointed forward and your hands are in 'space' and on those imaginary TT bars. This will lower your back, head, and streamline your arms and shoulders..... it will give you a TT bike position. Saddle height may have to be adjusted up and forward depending on a few things. Try it in training first.

Dave Z knows what's up.


That covers the basics of TTing on a road bike off the top of my head, the rest is up to you. If you're investing in riding a whole tour, regardless of the grade and regardless of the TT distance, you'd be mad not to spend a few minutes and a few $ on making sure you put yourself in the best position for the TT stage. Lance was right, every second counts.

Anyone who does their homework can easily debunk the 'level playing field' theory with attention to detail, and spending a LOT of money on equipment that still falls within the limitations of "mass start event equipment". In doing so, they'll create a bigger time-gap spread across the same grade. Not exactly fair is it?

Allowing TT bikes and equipment actually LEVELS the playing field by regulating what equipment can be used.

Tuesday, 13 December 2011

My Specialized BG Fit Experience

If I was offered a proper bike fit when I forked out $2,000 on my first road bike, I would not have purchased that particular bike. The fit was appalling. The frame was too big, the stem too long, and I had to adjust the seat height 2kms down the road. I didn't know any better at the time. It felt like a race bike and the 'expert' at the shop seemed to know what he was talking about. Why would he sell me something so expensive if it wasn't right? Yeah, naive as hell.

Fast forward six years - I've had a few bikes, had a few epic stacks, and still never been properly fitted to a bike. When Paul from Bike'n'Bean offered me a Specialized BG (Body Geometry) Fit I hesitated at first, it was only a week out from the Tour of Bright, but last week after Bright was done and dusted, I was onto it.

I do about 15,000kms a year with no niggles so I wasn't expecting any wholesale changes to my setup. I also didn't want the front end changed based on any 'comfort template' as I run a low front end to make it similar to being on the TT bike.

I was really surprised at how extensive the process was. Initial questions covering my riding (TT, road, crit, bank robbery getaways on BMX), injury history (collarbone snaps x3, busted hip), then I was measured up, laid flat, stretched, poked, and offered a cigarette afterwards. (ok, the last one didn't happen).

Of the things I can remember, the list and my results were:

Booty size - Sit on a squishy thing and measure the width of sit bones. 118mm.
Foot size / Arch support. 43. Medium arch (whatever that is?).
Touch your toes / Hip angle flex. Had good hip flexies, thanks TT bike! 
One leg squats. Foot/ankle rolls in. Normal.
Leg stretch straight/knee bent. No ballerina but it was ok.
Arms up test (shoulders/back). Handy post collarbone snappages. All good there.
On the bike - cranks at bottom-top-forward angle. Measurements taken.
Pedal motion review. Circles, not squares. All good.

The bag of tricks
The funky BG Fit stem was left in the tool box as front end was skipped. The handlebar drop was noted and the angle of the hoods/bar was given the nod anyway. What we ended up with was a few minor changes to my cleats, moving the saddle back a little, and some comfy inserts in my shoes. Nothing major to report on, and as it is my 'off season' I can't report on any power numbers to see if the changes have made any noticeable difference. After a few 100km the shoes are comfy and it feels like the cleat is more centered on the pedal spindle - as for this resulting in more power, I'll know when I start cranking into intervals and TTs in 2012.

The bike looking like a young Forrest Gump with his leg braces on.
It was good to confirm what I had was pretty close to the recommendations. The ultimate combination would be a BG Fit in a wind tunnel, you'd get the best of both worlds then - the art of comfort and the science to help you win races.

Who would I recommend a BG FIt to?
  • Someone getting their first road bike. No question. It would be a valuable addition, and exactly why a bike company offer it.
  • Someone getting a new road bike that is different to their current setup. ie. Punter road bike upgrading to a race bike.
  • Half of Beach Rd. Including those odd riders who swing a leg wildly through each pedal stroke that takes out children on the adjacent walking path. (we've all seen Kneesy McSideways, admit it).
See, wild-stroke Kneesy needs a BG Fit!
I've no doubt we'll be seeing other market dominating major players (Giant, Trek, Huffy) offer something similar in their stores as a value add.

That was my take on things. Don't take my unbiased word for it though, head on over to Specialized for their PDF on their site that explains a little more. If Andy Schleck is giving it a really cheesy thumbs up with a creepy guy looking on, it must be good! :)